


How to make a Beautiful Baby Bunting.
- Woman In The Middle

- Jan 28, 2020
- 5 min read
Updated: Jan 30, 2020
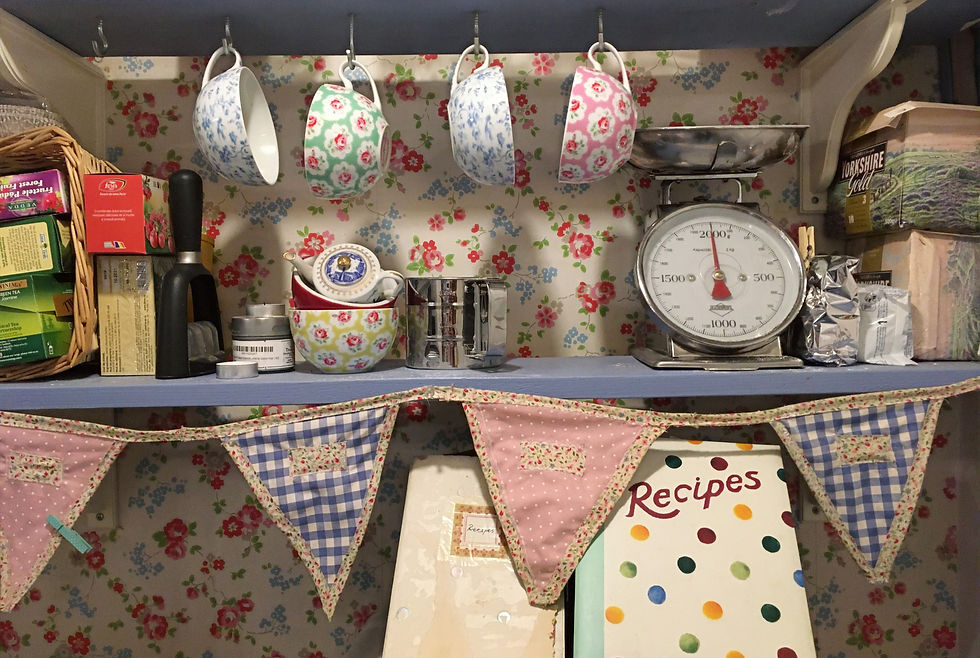
Or how to get from this:

to this:

It's easy.
Buntings have a long standing tradition of beautifying a room, a wall or a corner in an instant. They bring the room to life and they bring colour and joy. This is why they are used for parties, for weddings and for baby rooms. You can make them in one fabric only, you can go for just one colour or you can mix and match. You can even mix the sides of the flags. It's flexible.
For BabyBooks I am using a backing of luxury hessian fabric in order to personalise the flags with the baby's name. I quite like the rustic look that still manages to catch the eye. You can see them here.
However, for this tutorial, I decided to teach you how to make a two sided bunting. It will be colourful and versatile, it will last forever and will make you proud.
I have to say from the get go that making a bunting is one of the easiest things to do when you start out sewing. If you are a beginner, do not be afraid. I mean, what can you do so wrong that you can't hang on the wall afterwards? Remember, it will literally be on the wall, so quite far from any scrutiny. You will only see colour and joy. I promise.
Watch a few tips and tricks and then click subscribe. I will be back with more.
Confession time
The first ever thing I sewed on my first machine was a bunting. I still have it up in my house and it looks like this:
See? It is horribly wobbly and imperfect. So what?
I will always keep it as a reminder of how brave I was to do something I had never done before. You can do it!
And I will guide you every step of the way. Here we go.
STEP 1 - Choose your fabric
Decide what you want it for. Is it for a boy or a girl?
If it's a boy, I would like to see blues, greens, reds, teals, navy blues, greys, yellows, perhaps even orange.
If it's a girl, I want reds, blue, ivory, pink, green, purple, black. I want flowers and butterflies and bees and lady bugs.
You can go one colour, you can choose a theme (the sea, animals, etc) or you can mix and match.
STEP 2 - Cut out the template
You will need this. Print it out and then cut it on cardboard if you want to use it again. If this is a one time only, paper is fine. My template was 12 x 17 cm. You can also have it 15 x 20 cm. We will be losing a bit of the size because we are sewing on the back and turn it afterwards.


Dowload the free pdf file here.
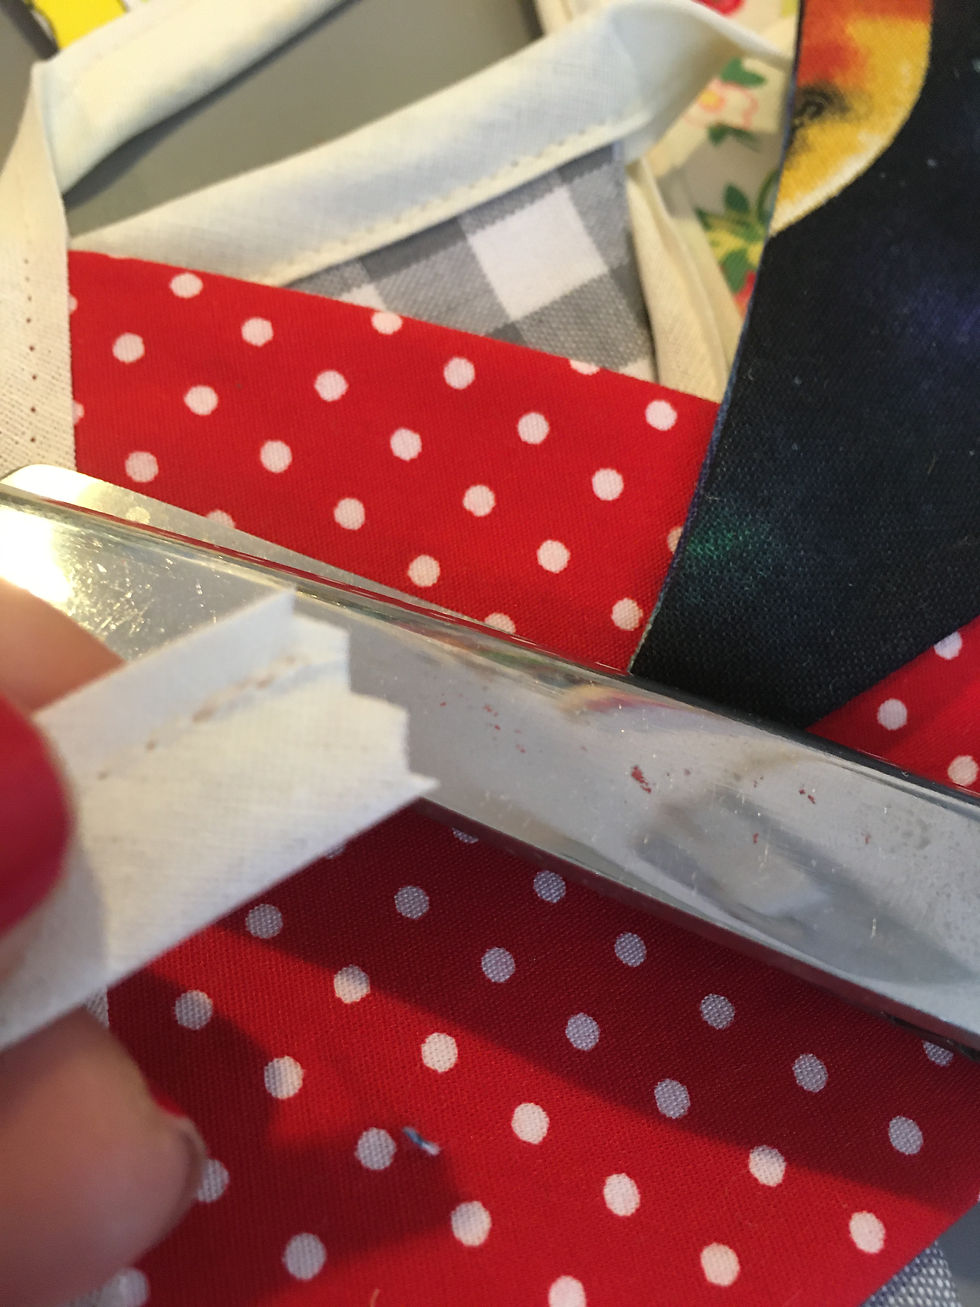
STEP 3 - Marking
Mark your fabric. Because it is the back of the fabric, you can use a pencil. As you can see in the picture below, I mark them continuously, in a sort of a zig zag shape. This is because I am trying not to waste any of my precious fabrics.

STEP 4 - Cut out the flags
Cut the flags out on the lines you made. You can use a rotary cutter, but you also need a board for that. Don't invest in things you don't need. You can very well use your scissors.

STEP 5 - Pair them up
Once you have all your flags cut out, you can start pairing them up. This is when you decide if you go with the same colour, or you mix and match. I like to mix and match but for the sake of simplicity, for this tutorial I am using the same fabric on both sides.

STEP 6 - Sewing
Sew the two flags together, face down. I am usually trying not to leave a big hem on the sides, as we need to turn them inside out and we don't want a bulk there. So I sew at approximately half a centimetre.

STEP 7 - Cut the tip off
This is important. Snip off the tip of the flag horizontally, but be careful not to cut the thread.This is again to avoid the bulk at the tip of the flag.

STEP 8 - Turn inside out
We have sewn the two flags together, we cut the tip off, it's time to turn it inside out. I find that using a chopstick for this step is a great way of protecting that fabric. Something sharper might rip through and you need to be gentle.

STEP 9 - Press down the flag
Use your iron for this step. Just press those margins down, to give it a professional finish. This step is quite important, don't skip it. The flag is going to deflate and turn from being a bulky shape into a nice flat little sweet thing that you can work with.

Hey, Phillips, let's make things better.
STEP 10 - Cut off the excess
Yes, do that. They will need to fit nicely in the bias binding (I will explain what's that, don't worry). Scissors will be perfect.

My cutting board needs replacing, I know.
STEP 11 - Repeat
All the 10 steps I described above? Yeah, you need to do the same for all your flags. The bunting in this tutorial has 15 individual flags. But you can have a bunting with as many as you like. The minimum I'd recommend is 9.
STEP 12 - Decide on the order of the flags
This is the moment you need to arrange your flags in the order you want them. If they are from the same fabric, then ignore this step. Otherwise, you'd want to spread the colours and patterns out, try to create a visually attractive decoration.

STEP 13 - Sew the bunting
Traditionally the flags are placed inside a bias binding (see pic). There are advantages to this, as the bias binding is naturally folding in half and you have a nice finish on both sides with the same amount of effort. It acts as a binder in which you put files, hence the name (I think). You will need 2,5-3 metres of this. If you don't have bias binding, you could use a ribbon, or you can make your own bias binding from left over fabric.


STEP 14 - Sewing
Start off with sewing the bias binding on it own, for about 30-35 cm before you include any flags. This will give you enough to work with to make a knot and tie it up. Then start with the flags leaving about 2,5 cm (1 inch) in between.


STEP 15 - Finish it off
Keep going after the last flag for about 30-35 cm, so you have an equal length of bias binding on both sides. Then cut and finish off with the pinking shears (it protects against fraying and looks better).

Well done!
Now you can hang it or wrap it up and give it as a present. Look again how pretty it is. You made this! You rock, girl.
If this tutorial helped, do let me know. If not, please tell me how can I improve it.
But remember, don't be afraid to do something new. After all, it is the only way we can make progress. And apparently, that's the meaning of life: to evolve. There you go, in case you didn't know.
Talking about evolving, getting out of your comfort zone and the like, here is my first video tutorial, made in your honour. You will see me in my natural element (lots of fabrics around), clarifying a few things. Let me know if it helps.
#howto #tutorial #bunting #baby #roomdecor #decoration #beautiful #beautifulbabybunting #beginners #sewingforbeginners #handmade
Thought: I am thinking of making Baby Bunting Kits that simply need assembling and sewing. For boys/girls. Only because I have beautiful fabrics and lots of it. If you're interested, let me know.
Comments